Shopify ID verification app blocks
Shopify Checkout Extensibility allows you to customize your store's checkout experience without relying on brittle changes to theme code.
With Checkout Extensibility enabled, you can simply drag and drop the Real ID verification app block into your checkout page, order status or thank you pages, and then Real ID will begin to verify customers.
Your Shopify checkout must upgrade to Shopify Checkout Extensibility to use these ID verification flows.
Verifying IDs during checkout
Using Real ID's app blocks for your Shopify checkout page, you can require ID verification at any point during the checkout process. Customers will be required to verify their ID before they can submit their order.
This short video shows you how to set this up on your Shopify store step by step:
At this time only Shopify Plus stores have access to checkout customizations through app blocks. If you do not have a Plus subscription, but require customer ID verification before purchase consider our before checkout flow instead.
Setting up Real ID
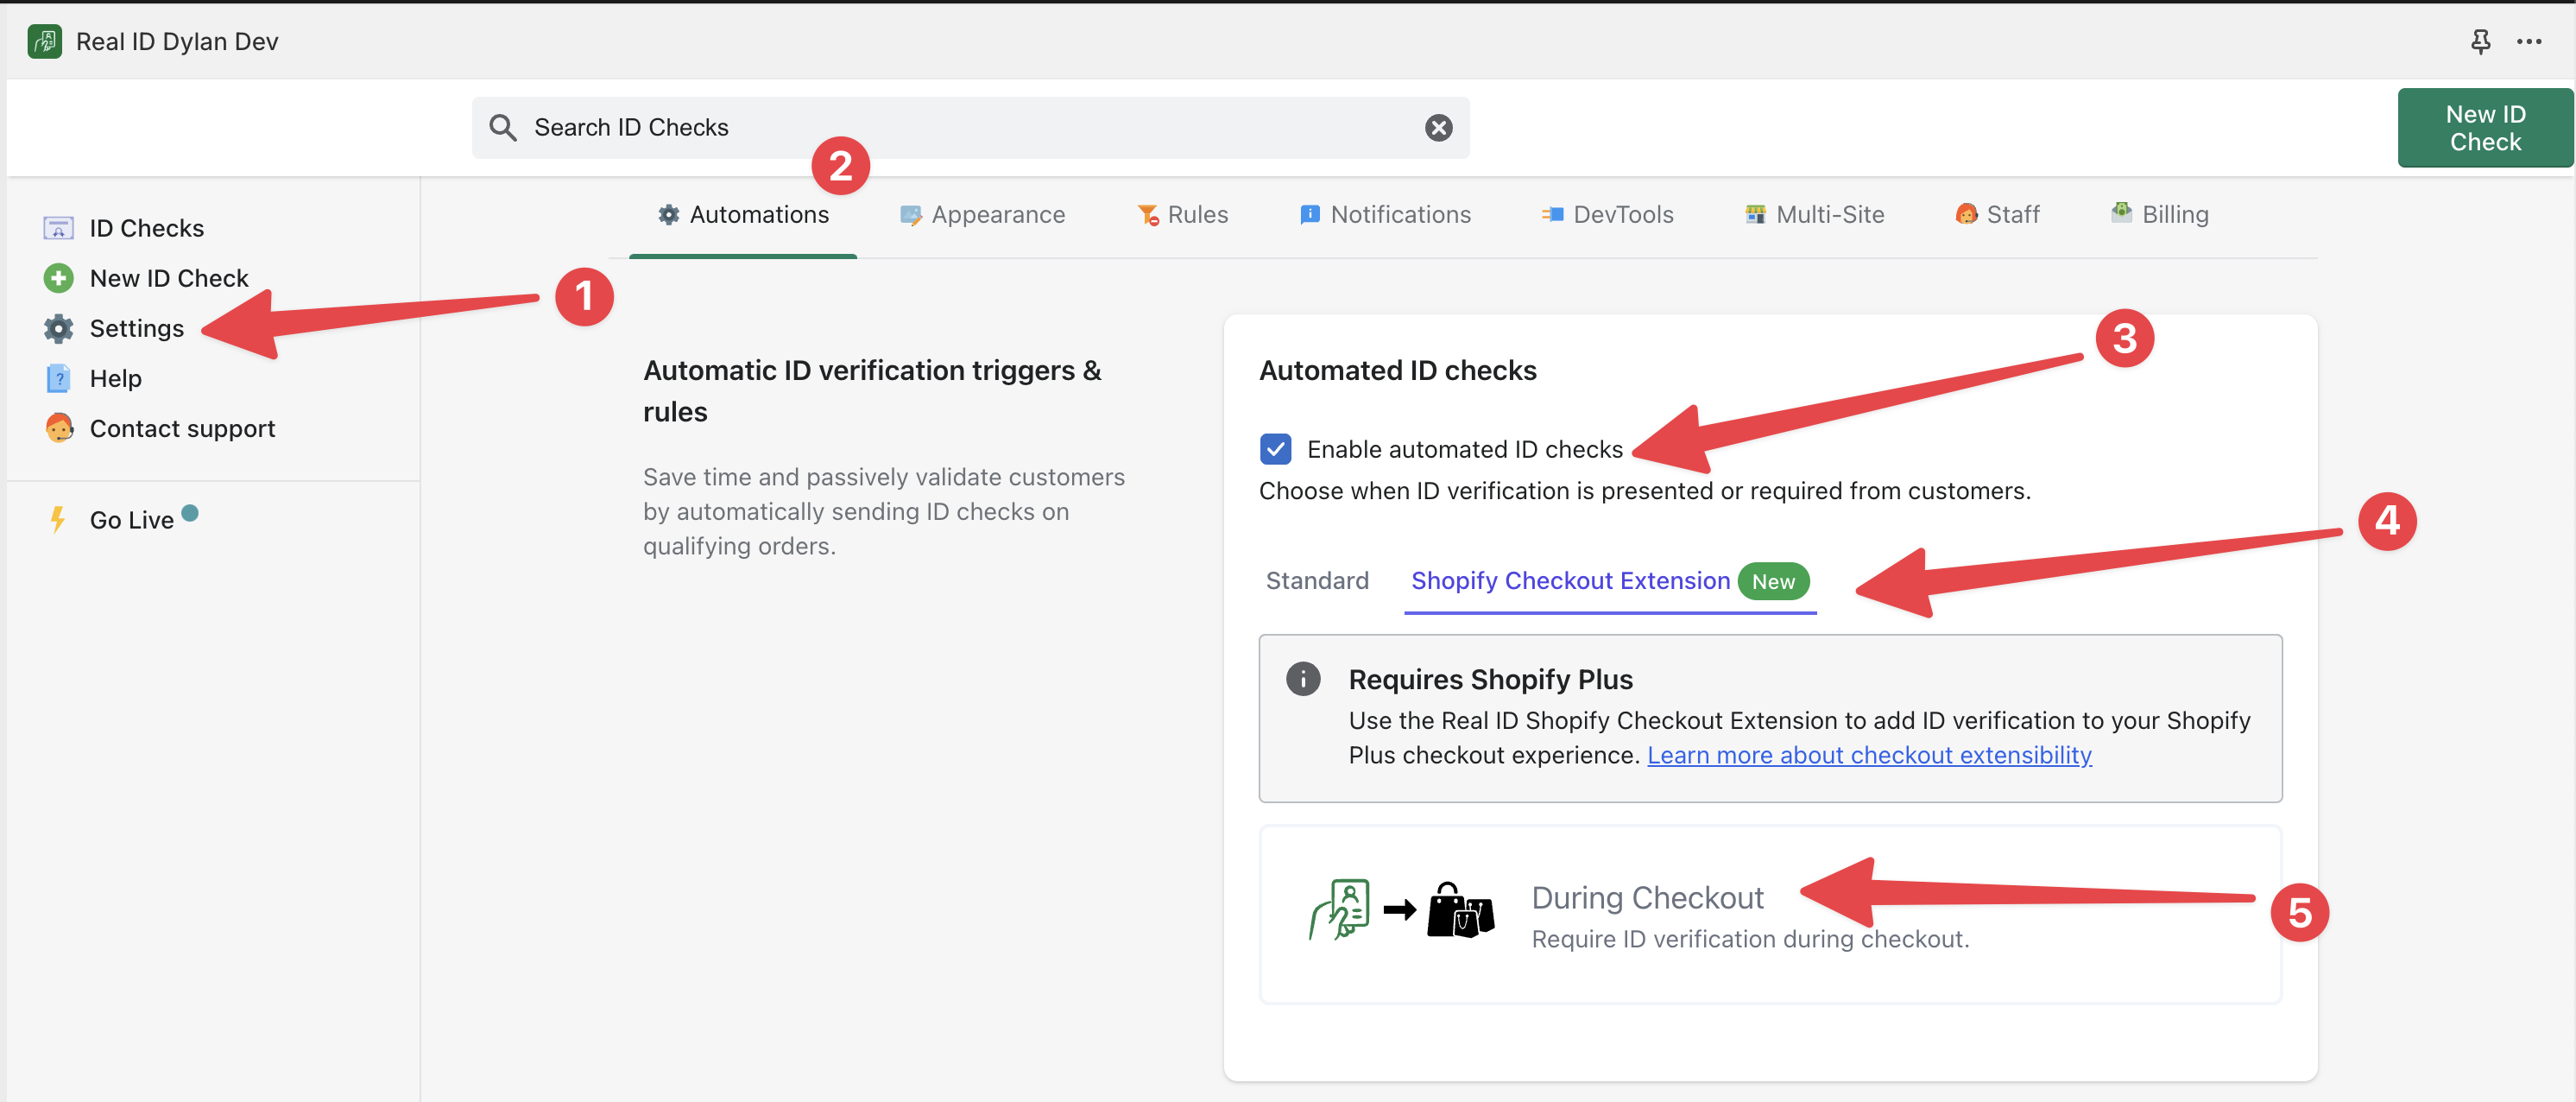
To get started, first open the Real ID app. Then open the Settings page.
Enable automatic verification in the Triggers tab, then select the Shopify Checkout Extensibility tab to view the available options.

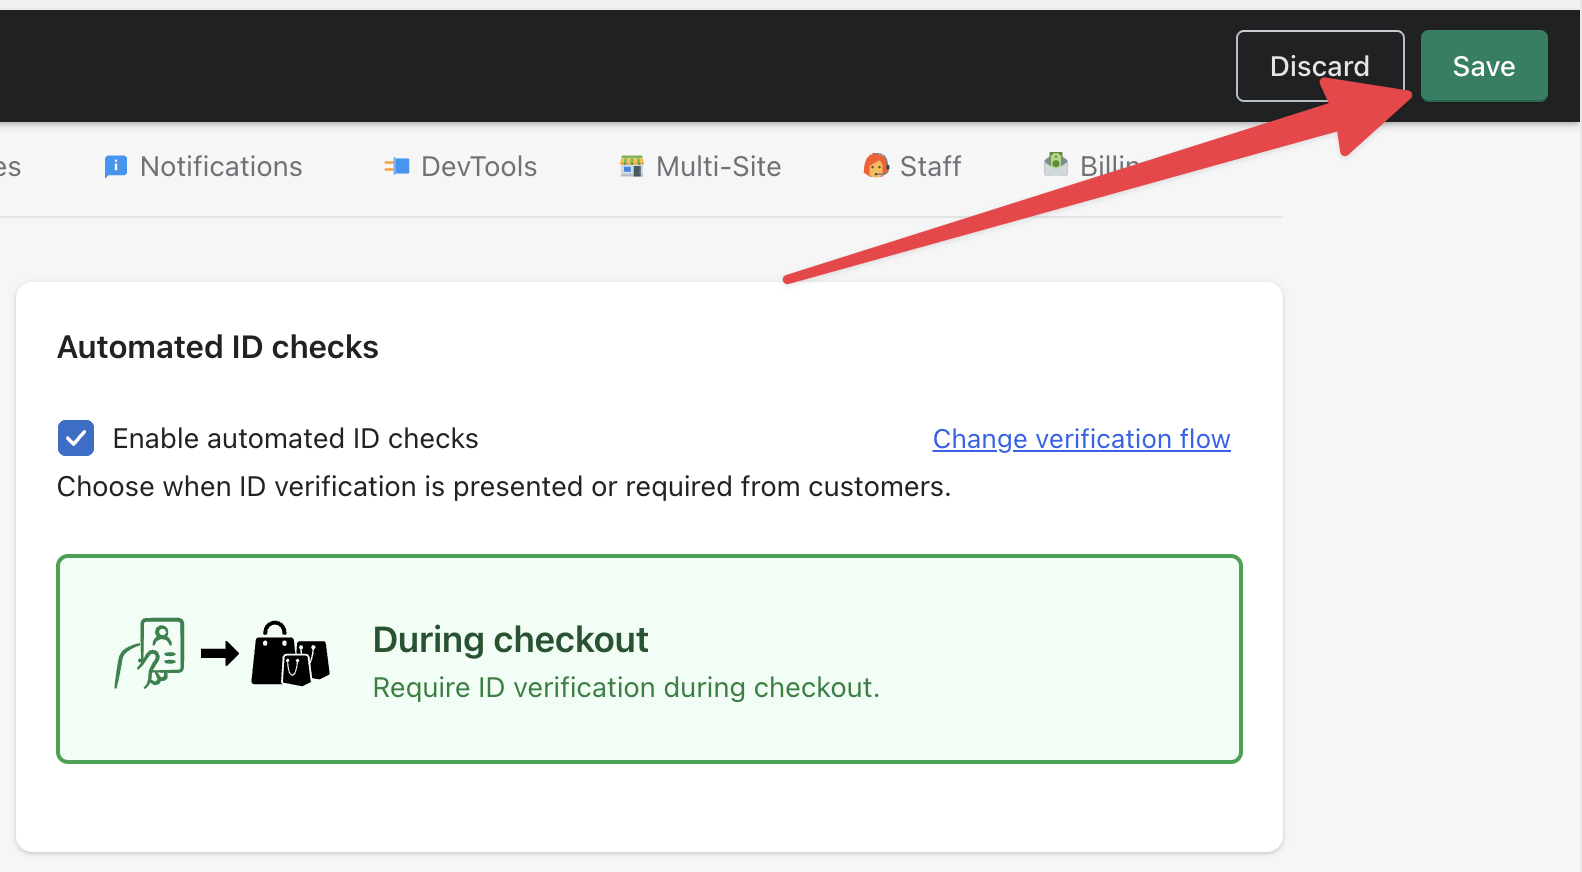
Then select During checkout option. Don't forget to click Save in the top right of the Real ID app to apply the flow.

Adding the ID verification app block to your theme
Now open the Online Store channel in Shopify, click the Theme section and click Customize to open the theme editor.

With the theme editor open, click the page dropdown and select the Checkout page.
Then at the bottom of the page, you'll see a button to Add app block, click this to view all available app blocks.

Click the ID verification app block to add it to your checkout page.

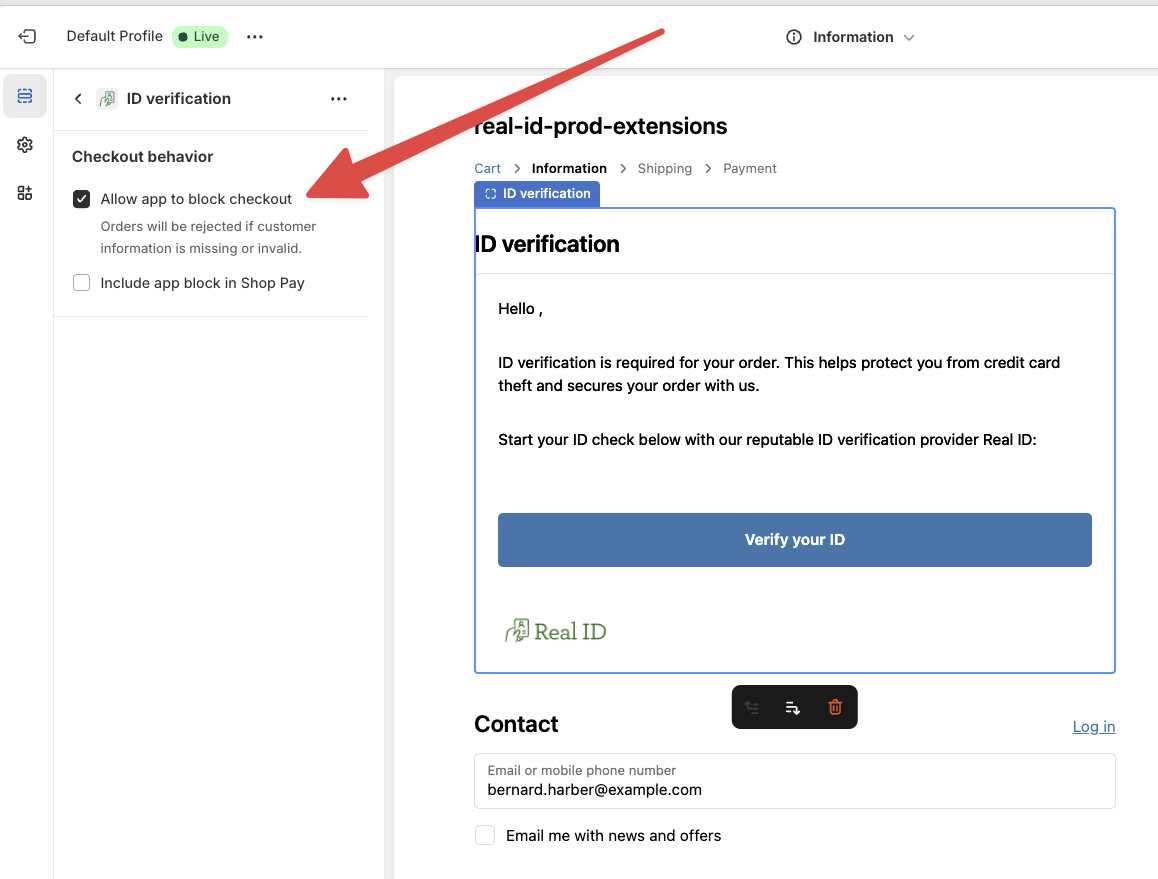
Make sure the Enable app to block checkout option is checked. Otherwise the app block will not be able to block unverified customers from checking out.
Now that the app block is added to your checkout, Real ID will automatically require unverified customers to complete ID verification before continuing through the checkout flow.
Logged in verified customers will not be required to complete ID verification.
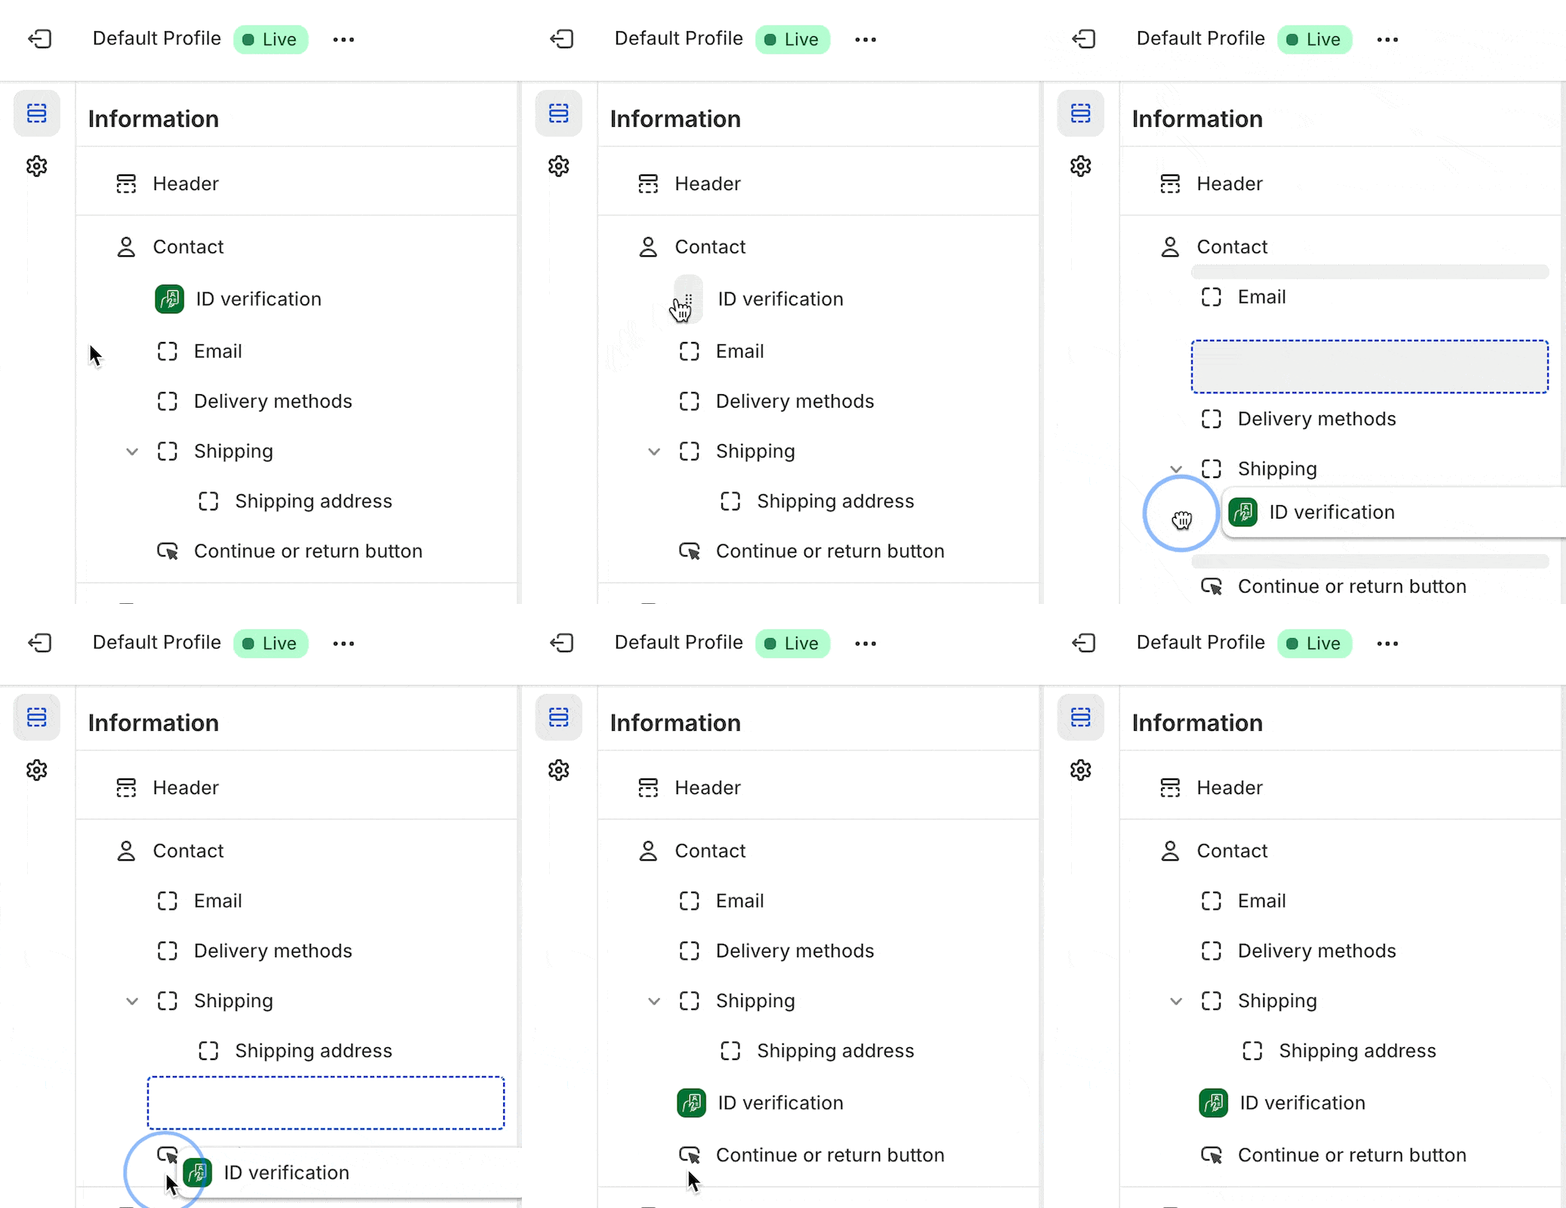
If you'd like to change the position of the ID verification prompt in the checkout page, simply hover over the app block and drag it up or down between the other checkout blocks.

Remembering already verified customers
By default this flow option will already remember verified customers. First the system will attempt to find their past verified ID by the customer's Shopify account, then it will attempt to find the customer's ID check based on the customers email address.
By Shopify account
The customer will need to be logged in in order for Real ID to detect their current verification status by their Shopify account.
Please make sure that your Shopify store allows customers to login to their accounts.
You can check this by opening the Settings section of your Shopify store, then opening the Customer Accounts area.

At the top of this section, you'll see the option to allow customers to login to their own accounts, make sure it's enabled. The option is labeled as Show login link in the header of online store and at checkout.
Then choose between Classic customer accounts or New customer accounts. Real ID is compatible with either choice.
The main difference between the two is that the New customer accounts choice will require the customer to open a link sent to their email address in order to login.
Whereas the Classic customer accounts allows email address and password combinations to login, which allows account sharing if you have the email address and password.
By email address
If the customer isn't logged in, then the system will attempt to find their past verified ID by the customers email address.
If any check is found by the customer's email address, then it will prompt the customer to confirm ownership of the email address through a confirmation code.
After the customer enters in their confirmation code, they will be recognized and allowed to complete checkout even without logging in.
Frequently Asked Questions
Will ID verification be required for draft orders as well?
Yes, the same ID verification app block will appear for draft orders, even in the checkout links shared from the POS or from the Shopify Admin.
How can I restrict ID checks to specific shipping locations with specific products in the cart?
If you require ID verification for specific countries or regions only for specific products like knives, please contact us for support. We have custom triggers for this use case.
Can I still customers to check out, even if they've failed to verify their ID automatically
Yes, in the ID verification app block in your checkout page in your Shopify theme, untick the Allow app to block checkout checkbox and then save your change.

This will allow unverified customers to continue through to checkout.
If you choose to disable the ID verification requirement, it will also allow customers to checkout even if they do not upload any photos whatsoever.
Verifying IDs after checkout
Verify your customers IDs in the Order Status page that is displayed after checkout if you have Checkout Extensibility enabled on your store.
You can use the Real ID Checkout Block to prompt for ID verification after the customer has placed their order.
You might want to pick this option because you only require ID verification on specific orders:
- High or medium risk orders
- Orders with mismatching shipping and billing details
- Orders with a specific payment type
Getting started
First let's enable the After checkout flow for Checkout Extensions in Real ID. Open the Real ID app and navigate to the Settings page:

- Open the Automations tab
- Select Shopify Checkout Extensions
- Select After checkout
- Decide which types of orders should trigger ID verification
- Click Save to apply the change
Real ID will now autoamtically send emails and SMS messages to customers that need to verify their ID for their orders. But the next step will add the ID verification prompt directly in the Order Status page.
To add ID verification to the order status page, you'll need to add the Real ID the checkout block to your online store's theme. It just takes a few clicks.
Open the Online Store sales channel from the left hand menu, and select Themes:

Now let's open the Theme Editor by selecting the Customize button:

Once the theme editor is loaded, click the top dropdown to select the Checkout & Customer Accounts page:

You should now see a sample checkout page loaded. At the top of the page click the dropdown and select Order status:

Then at the bottom left hand side of the page, you'll see an Add app block prompt. Click this button to show a menu of available blocks to add to the page:

Then, select the ID verification block:

Now drag it to the top of the Order details layout section on the page:

And that's it! Your customers will see a prompt to verify their ID if their order meets one of the conditions for your triggers, or if you've set up a Shopify Flow workflow to create ID checks for them.
If your store doesn't have Shopify Checkout Extensibility enabled yet, you can still use the no-code after checkout integration which integrates with the Order Status page.